How to Set Up Gmail Email Delegation in Google Workspace (2025 Guide)
Summary
Learn how to set up Gmail delegation in Google Workspace and explore two solutions (auto-forwarding, Mail Echo for Gmail) for the new mail notification issue in delegated accounts. This guide also includes installation and cost information for Mail Echo for Gmail.
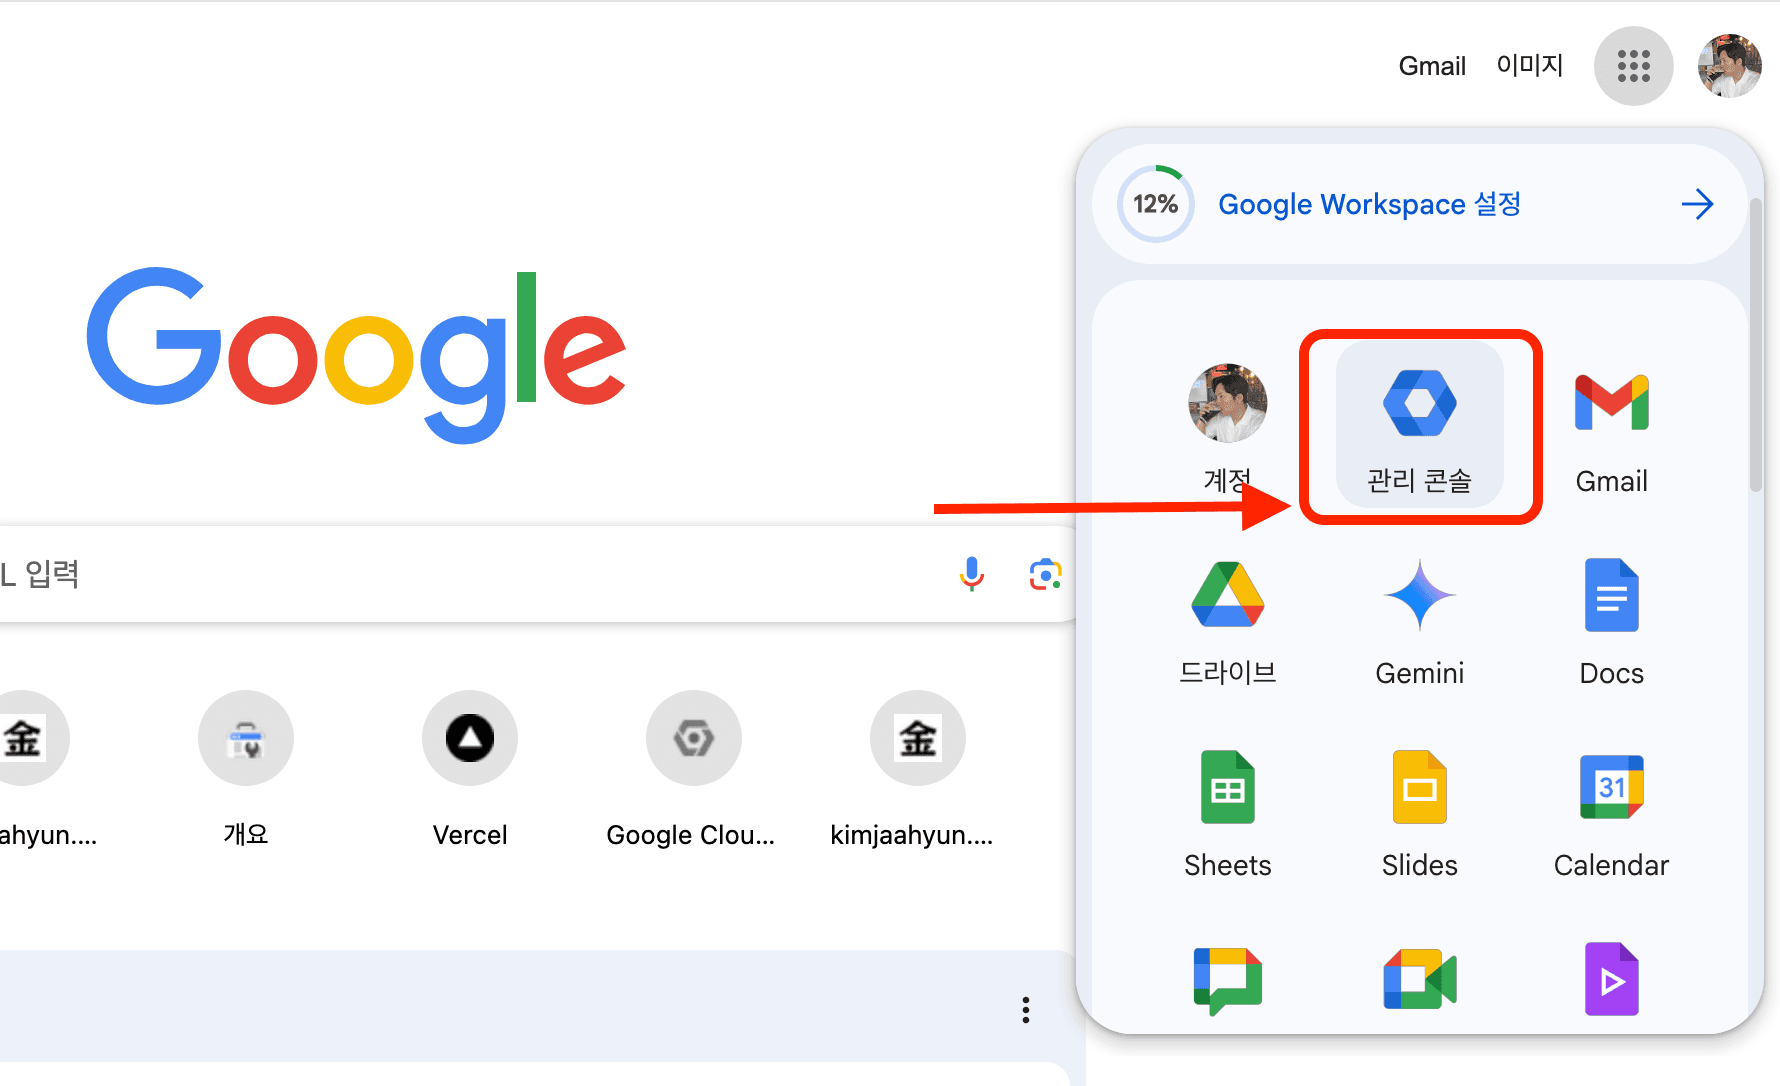
If you are using Google Workspace instead of a personal account, you first need to configure settings in the Google Admin Console to use Gmail's email delegation feature.
🔧 1. Google Workspace Configuration
📋 Enable Email Delegation in the Admin Console
Step 1: Access the Google Admin Console
Click the settings icon (gear shape) at the top of Gmail.
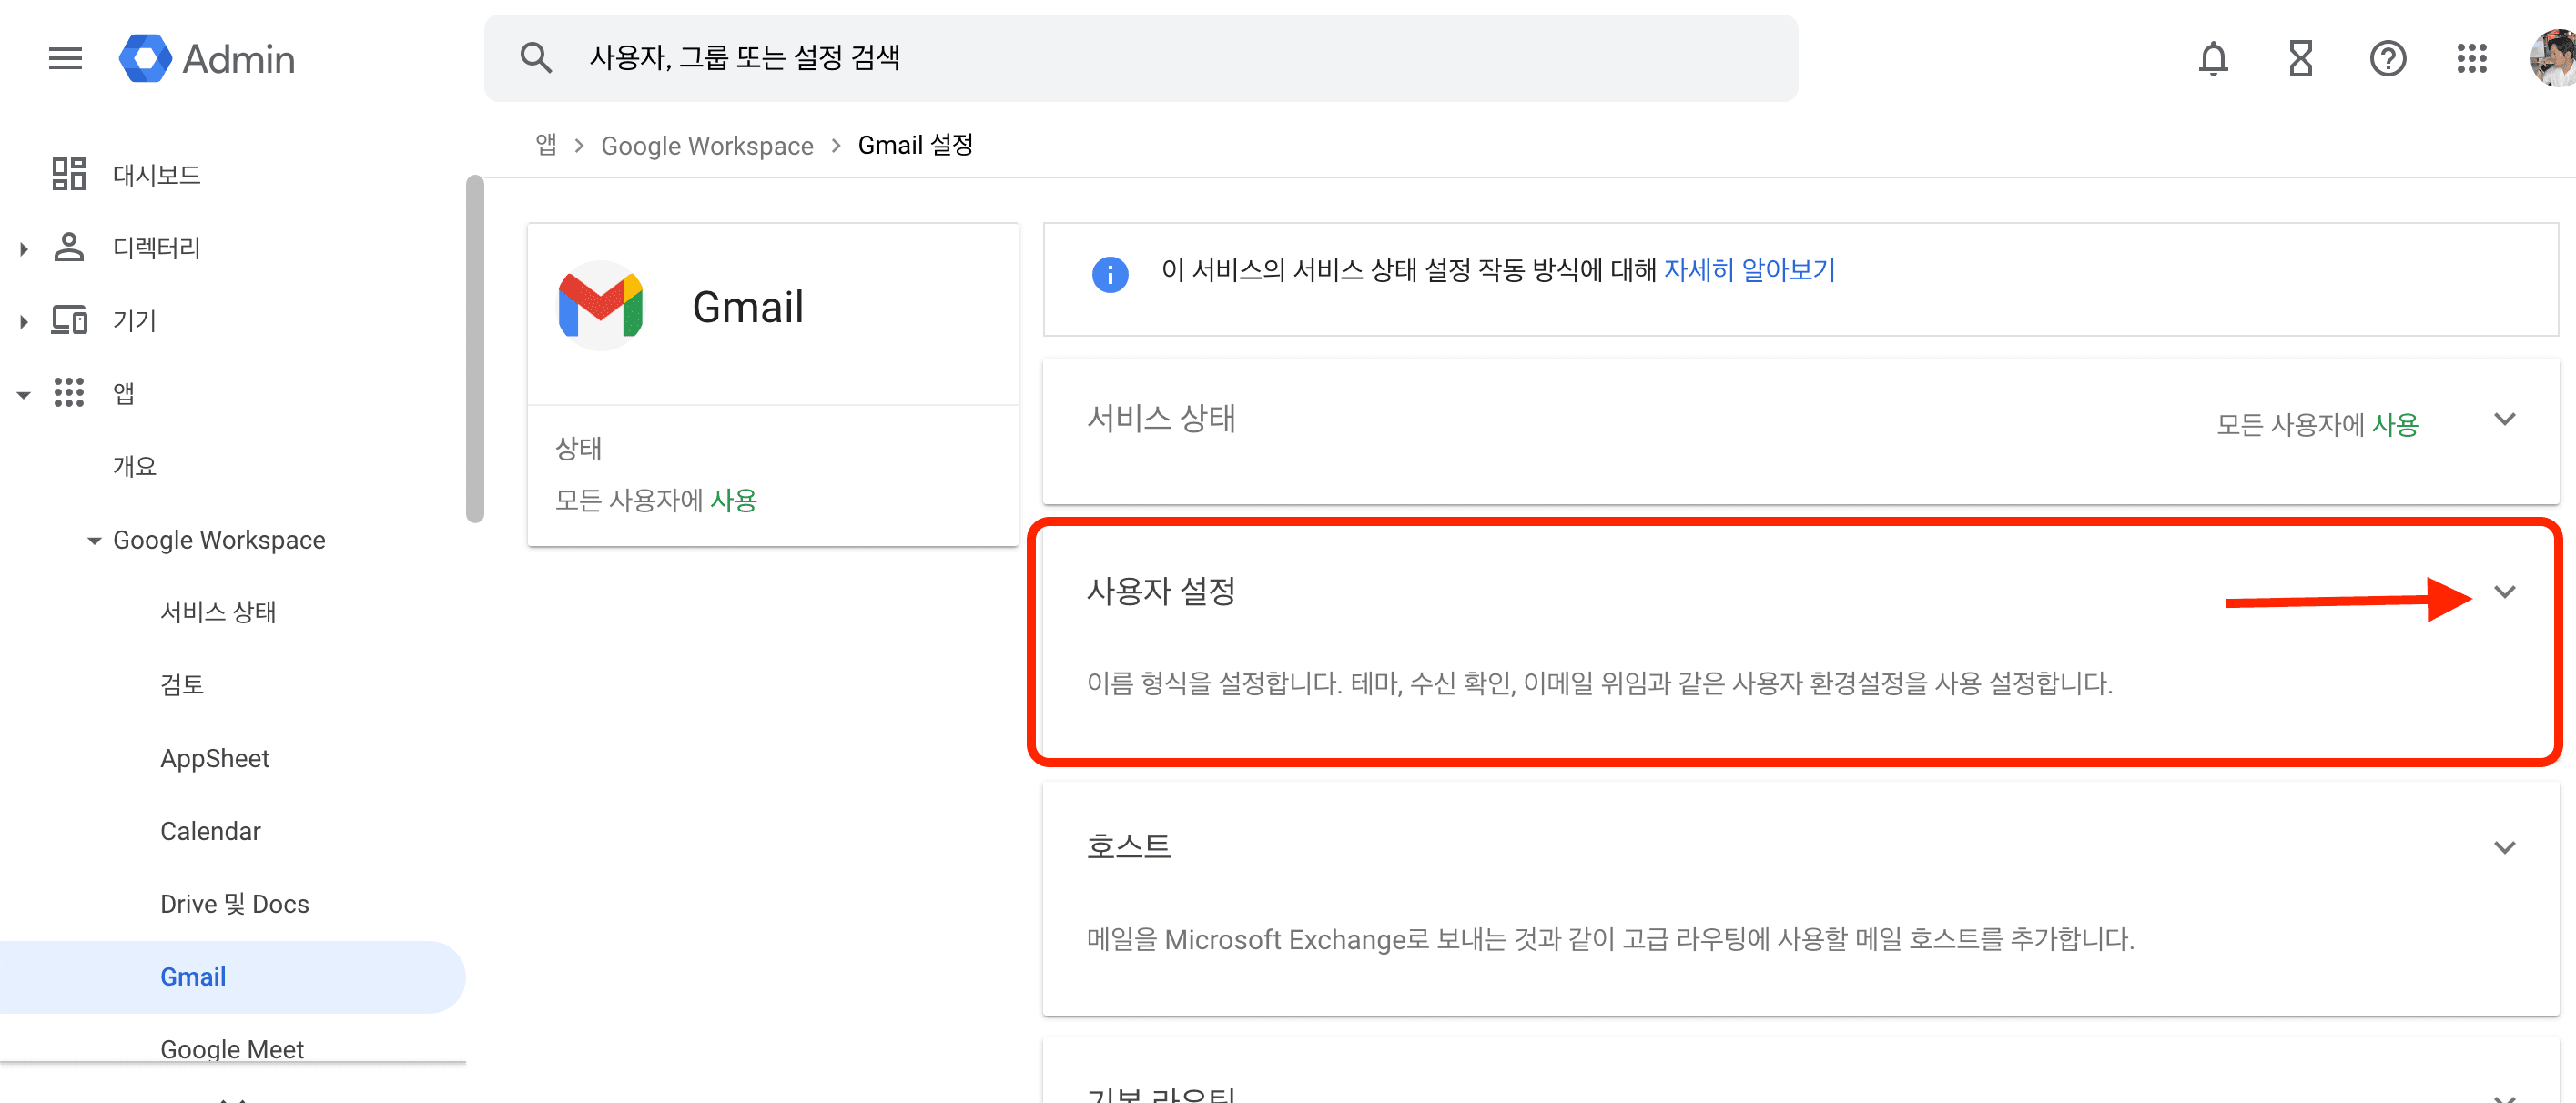
Step 2: Navigate to Gmail Settings
Sidebar > Apps > Google Workspace > Gmail

Step 3: Expand User settings
Click the down arrow in User settings.
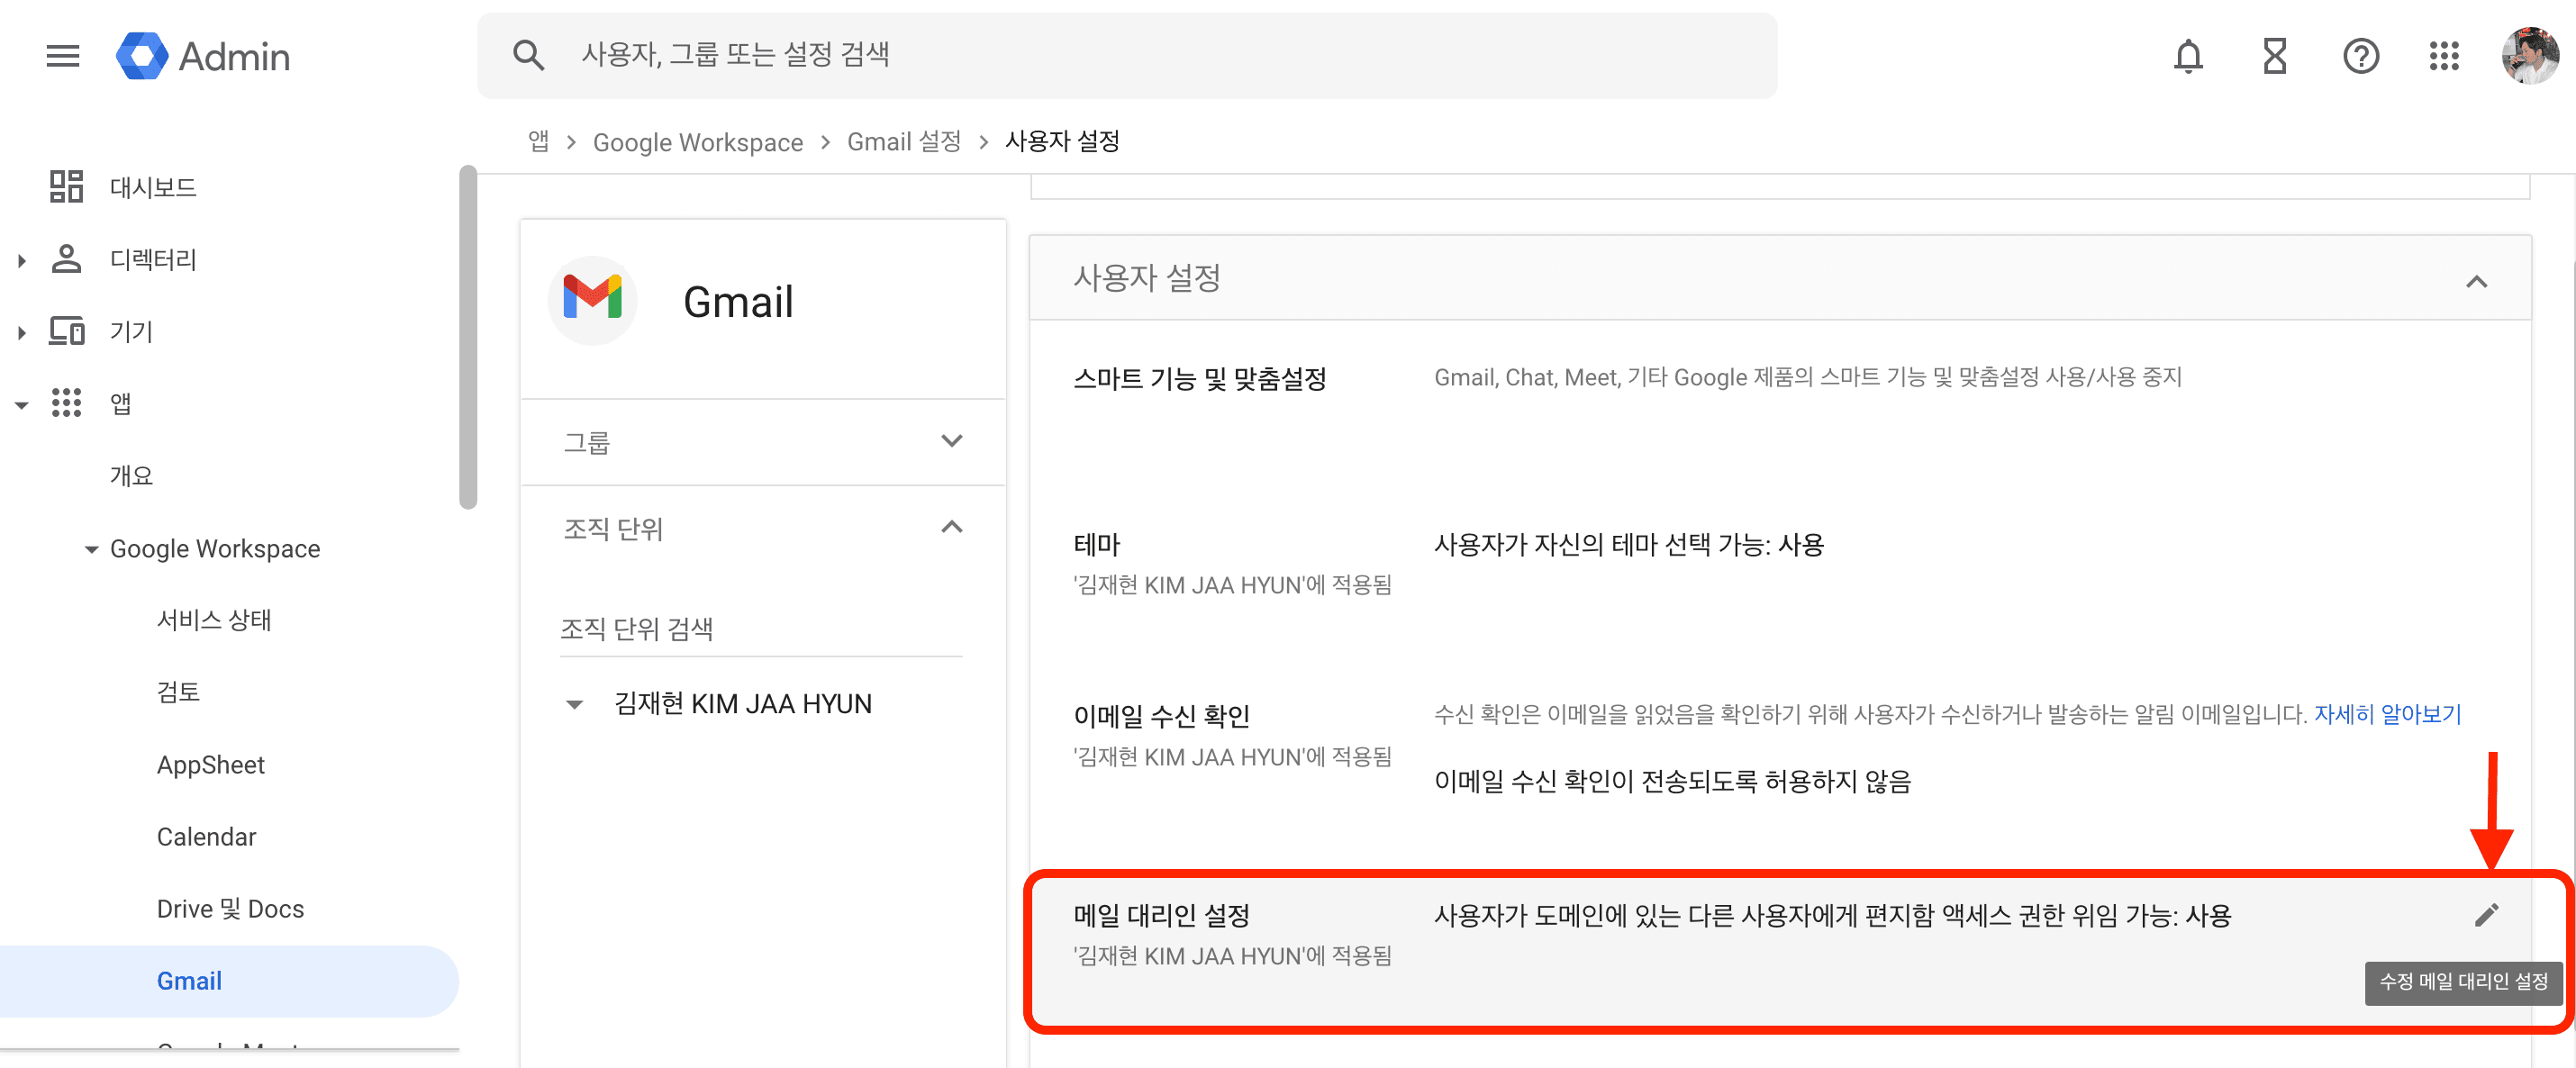
Step 4: Edit Mail delegation settings
Click the pencil icon in the Mail delegation settings.
Step 5: Enable Required Settings
In the Mail delegation settings, only the items marked with a red box are mandatory. Check the others as needed and save.
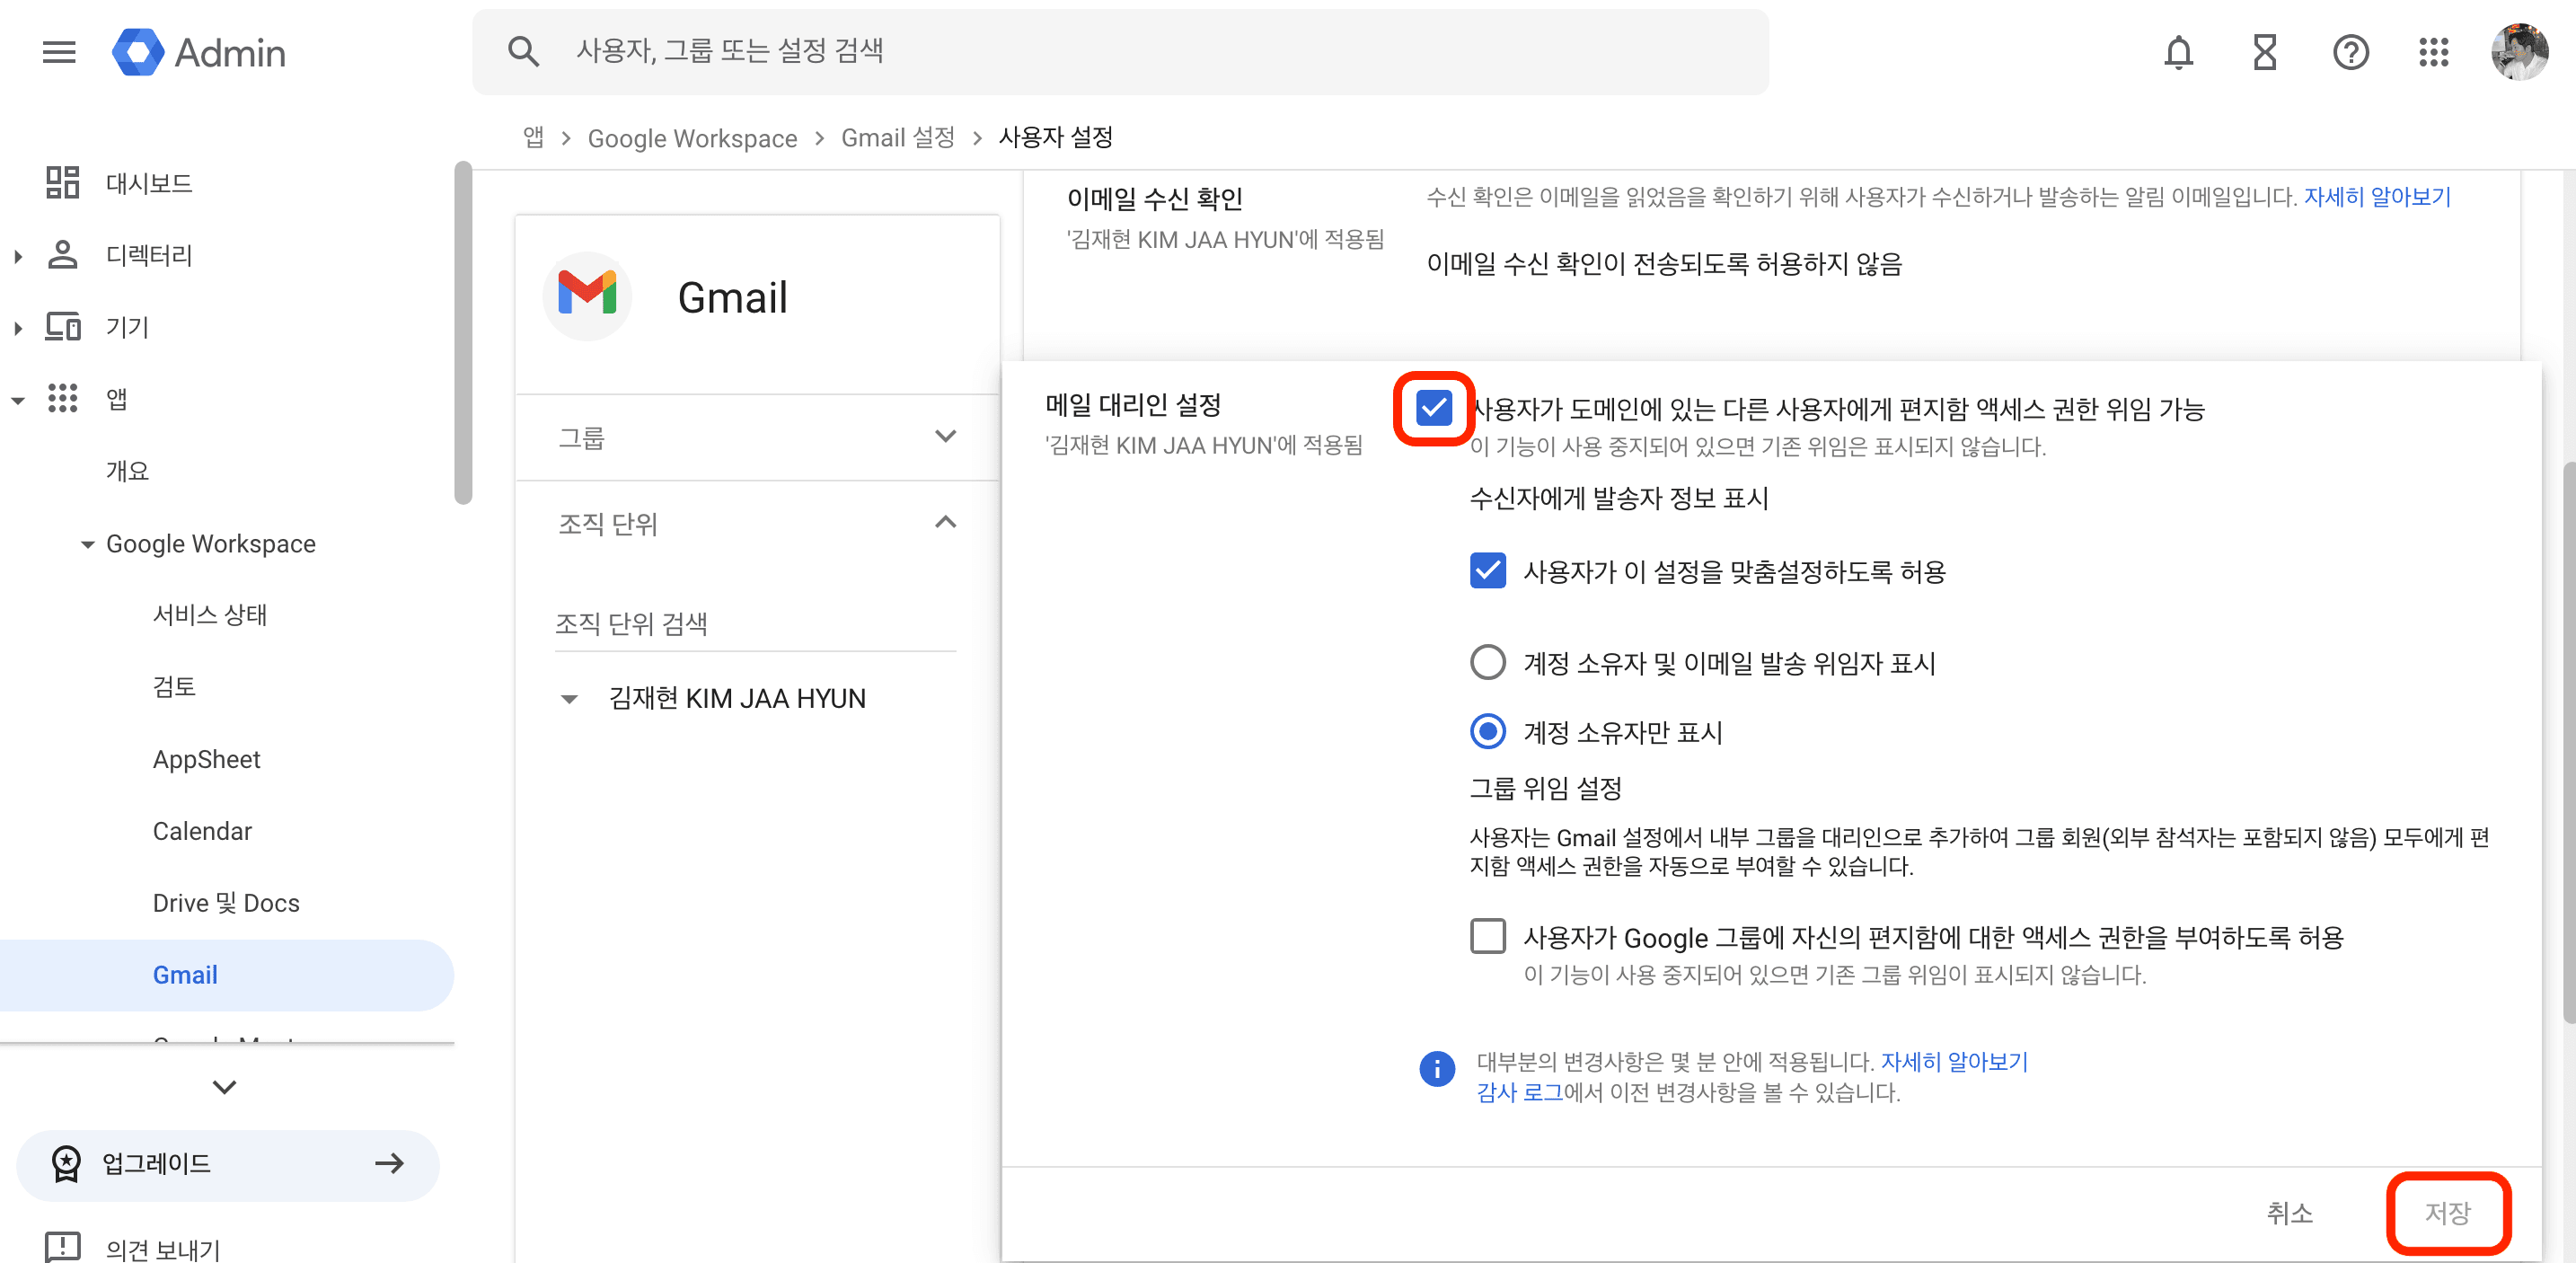
Step 6: Confirm Activation
Verify that "Let users delegate access to their mailbox to other users in the domain" is Enabled.
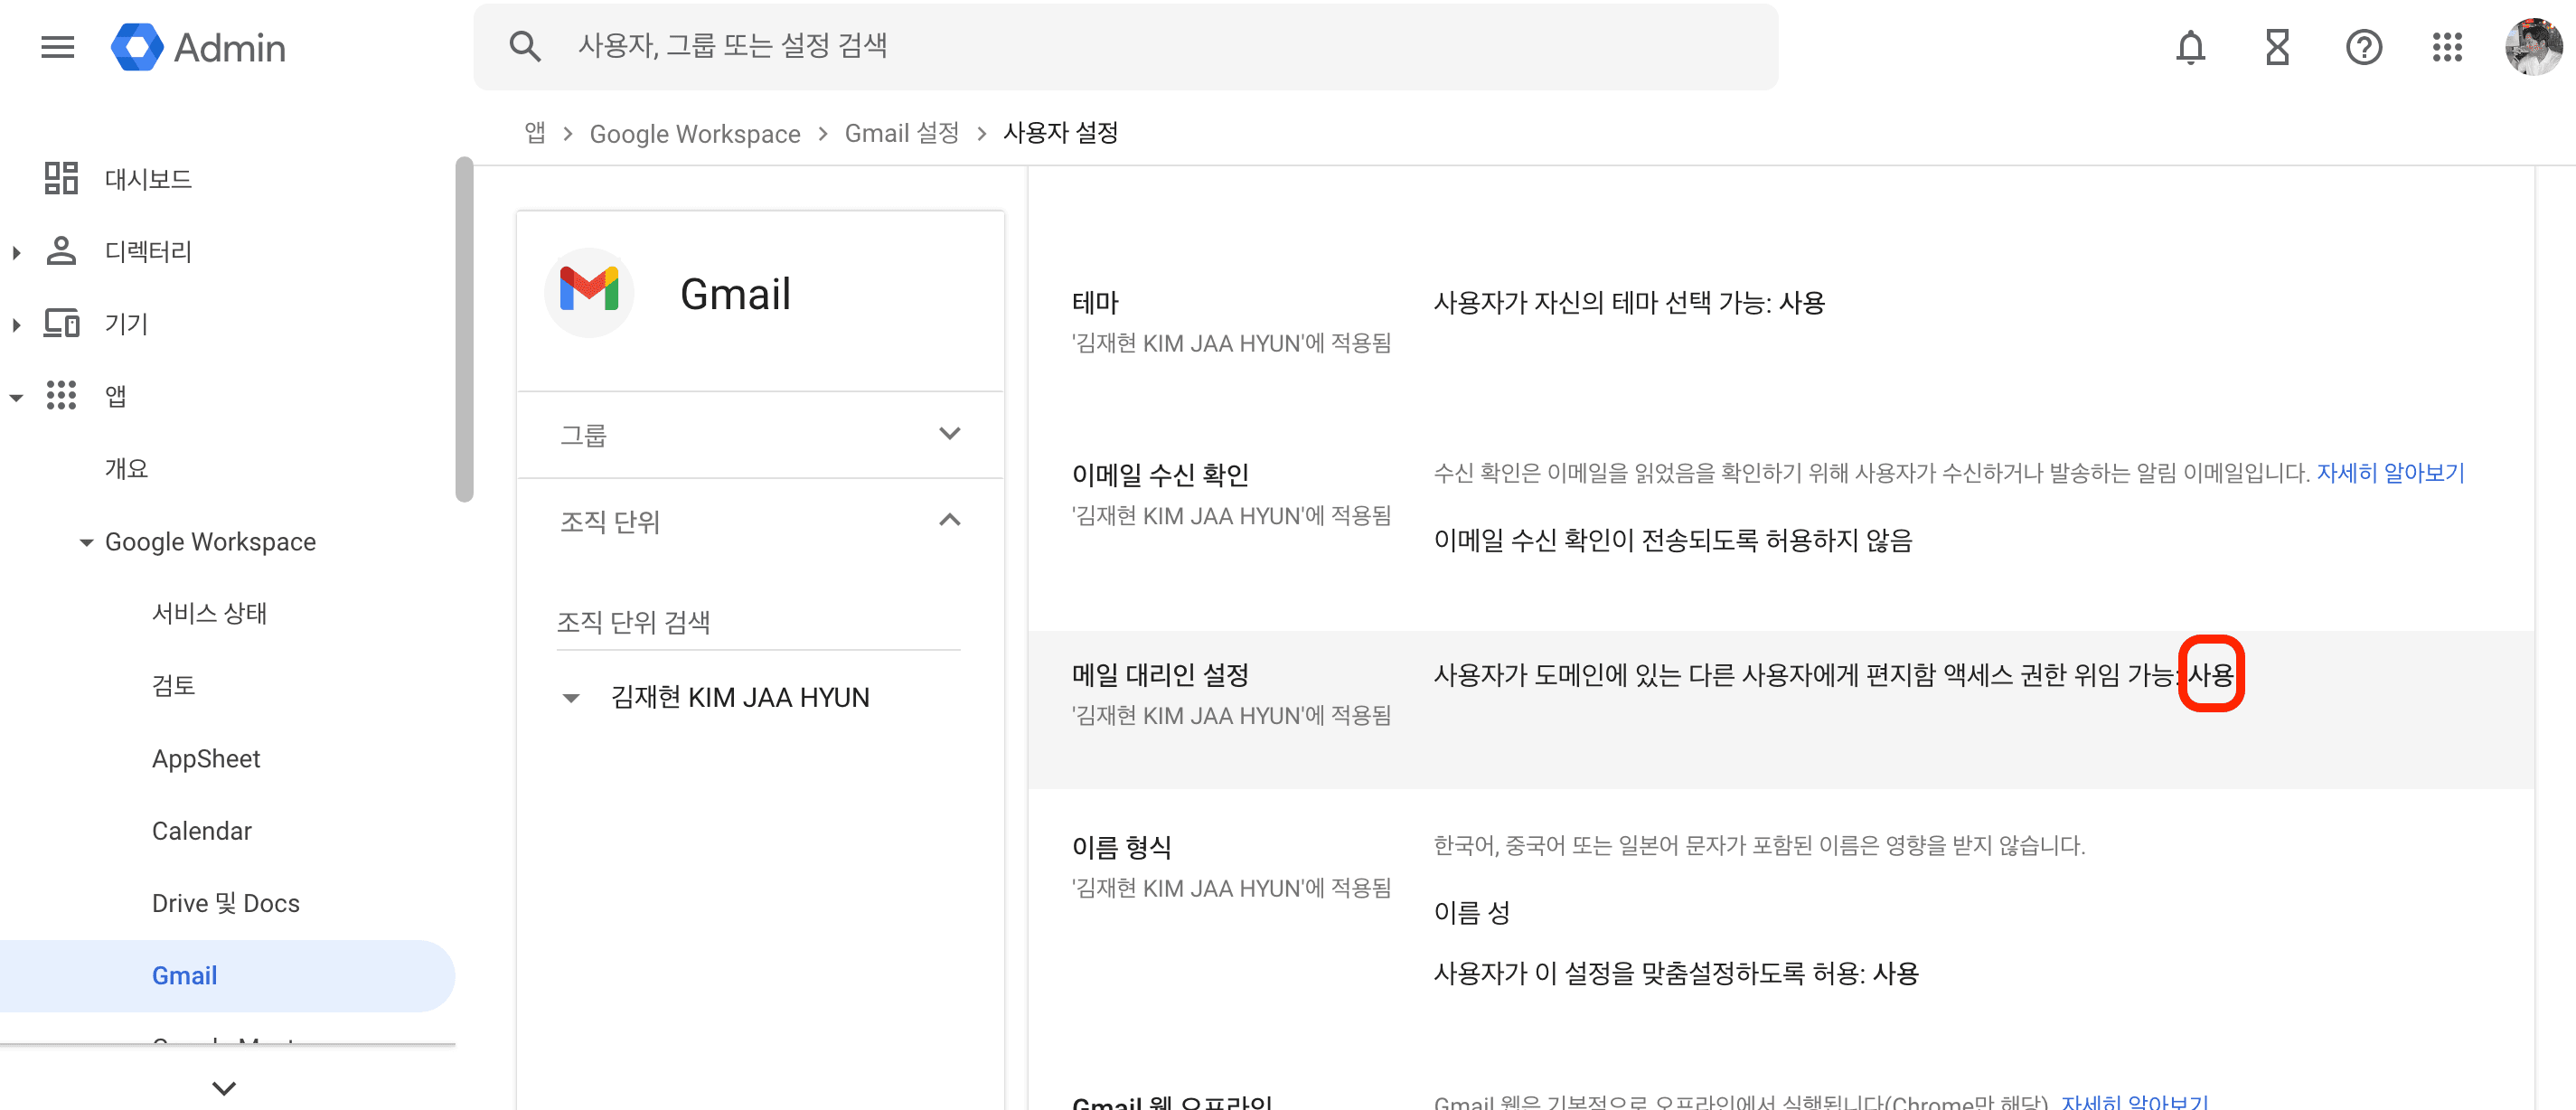
✅ You can now set up email delegation in Gmail.
📧 2. Gmail Settings
🔄 Step-by-Step Guide to Email Delegation
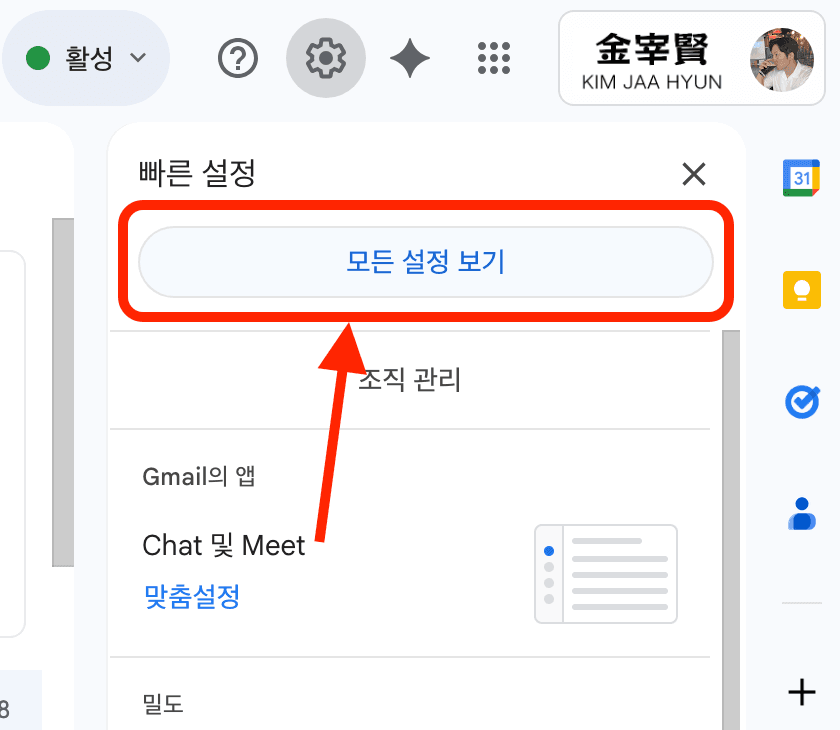
Step 1: Access Gmail Settings
Step 2: Go to the Detailed Settings Menu
Click "See all settings".
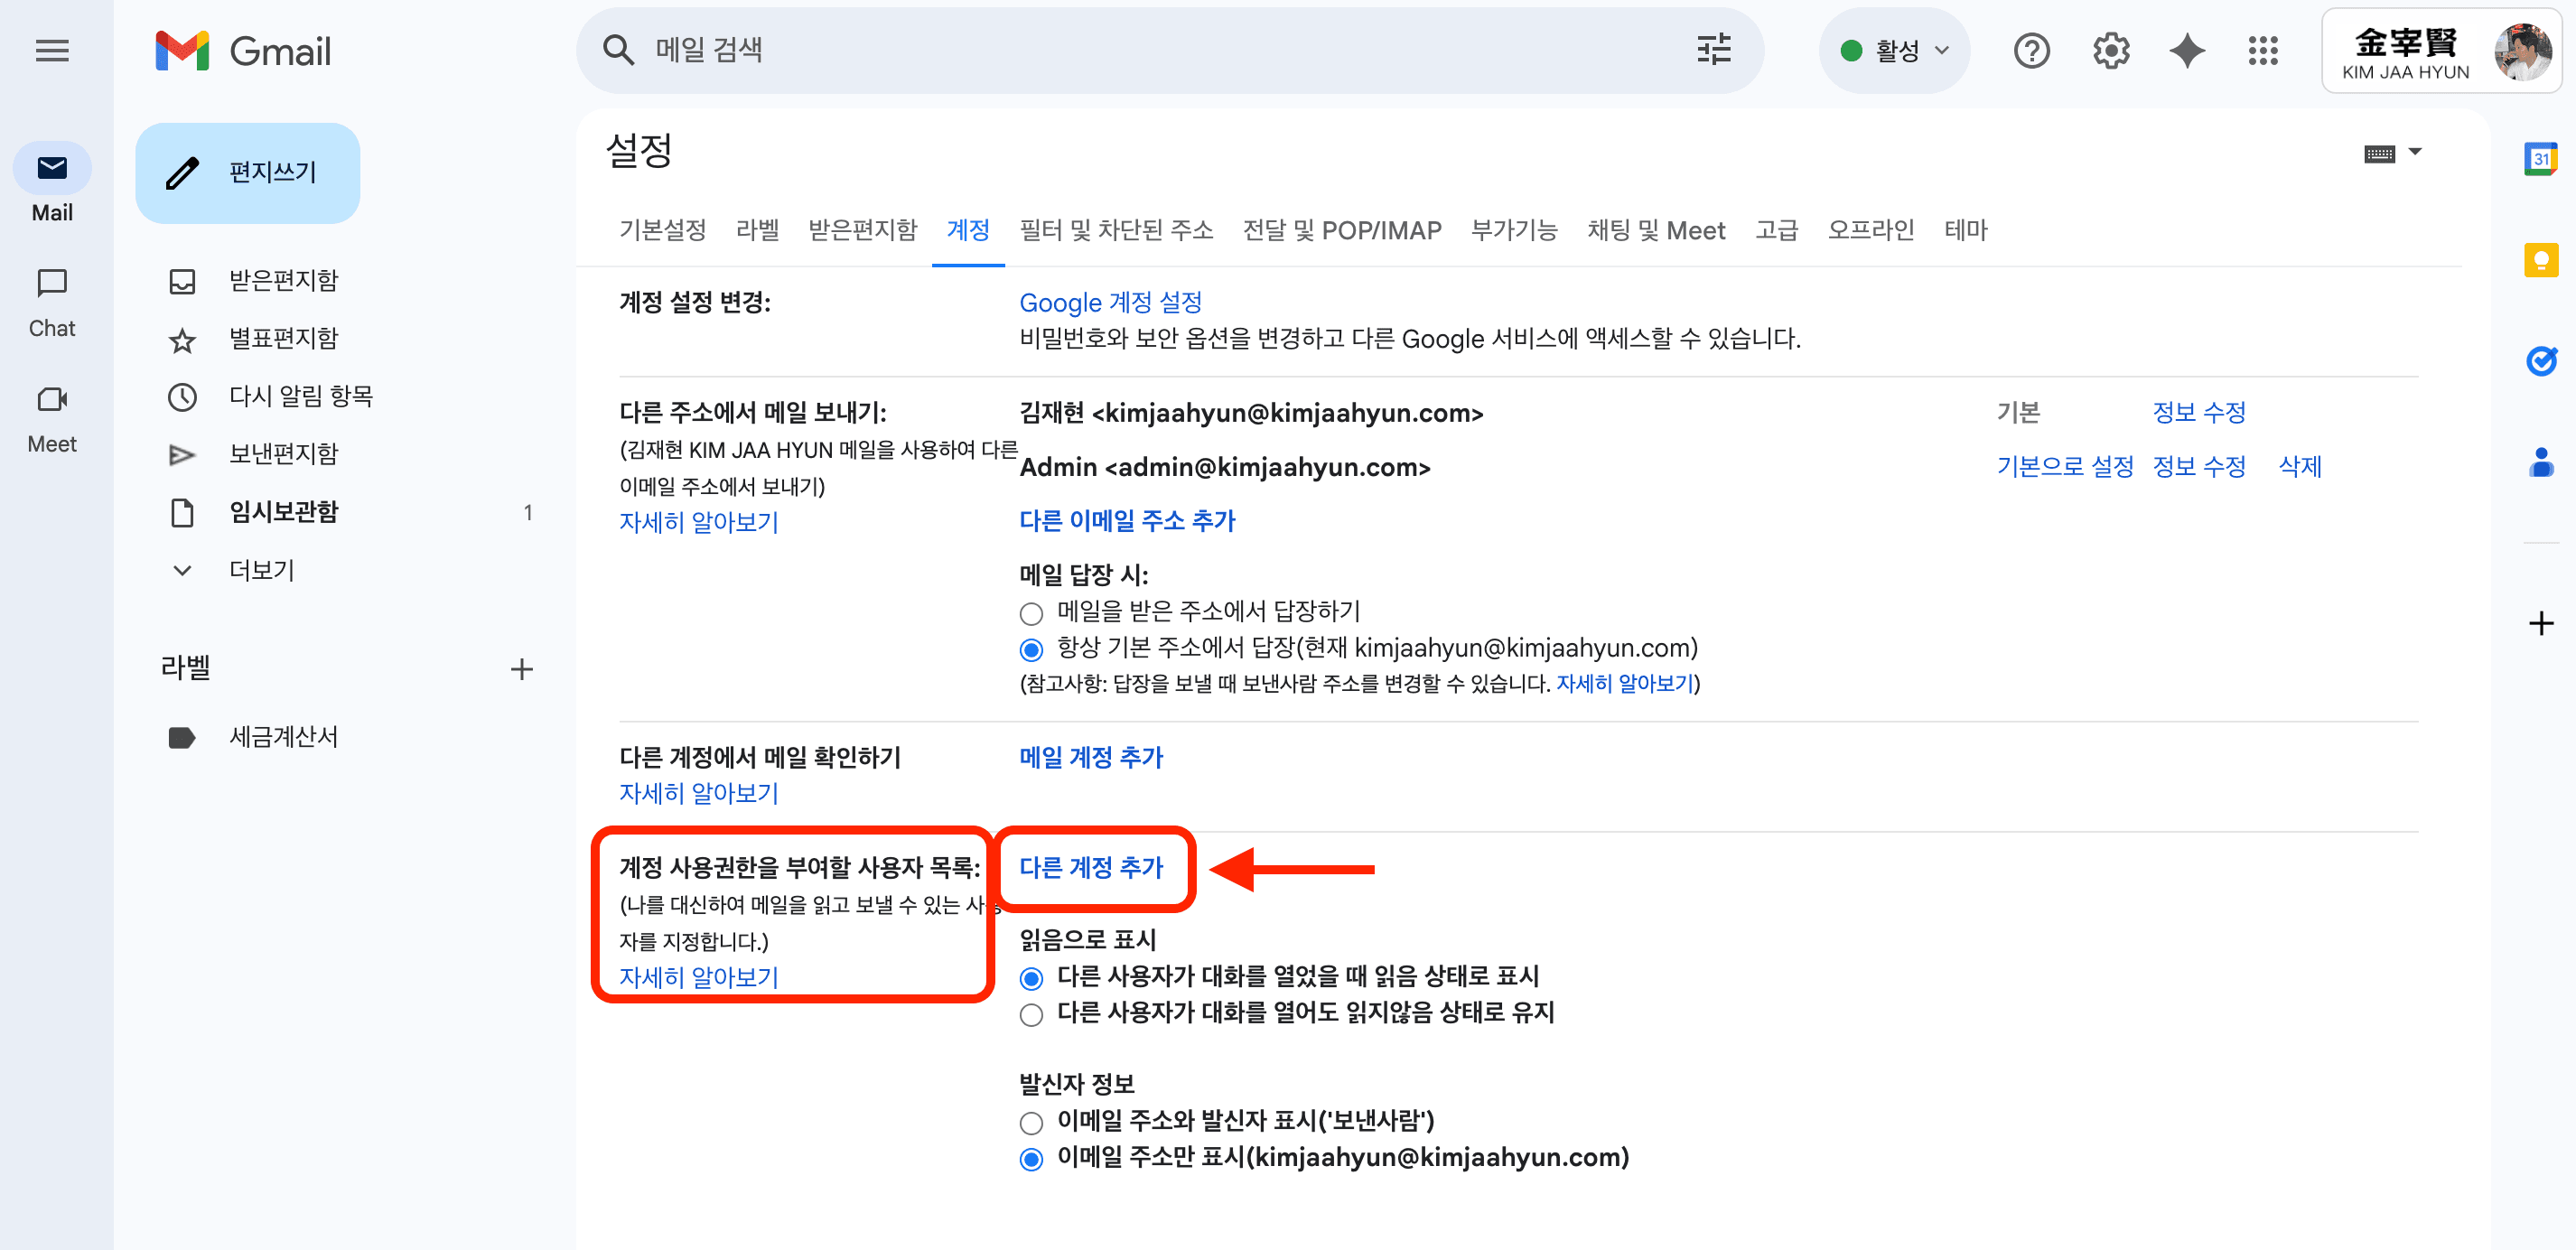
Step 3: Select the Accounts Tab
Click the "Accounts" tab.

Step 4: Add a Delegated Account
In the "Grant access to your account" section, click "Add another account".
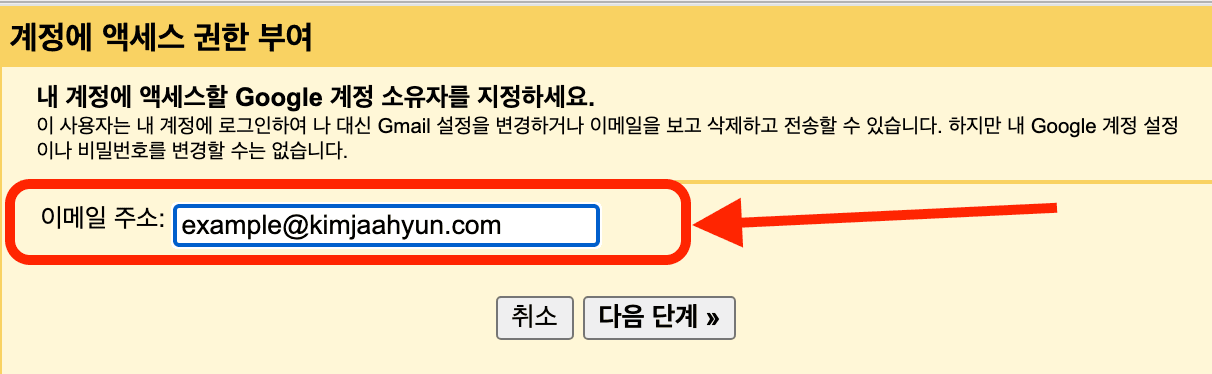
Step 5: Identity Verification
Proceed with identity verification.
Step 6: Enter the Delegate's Email Address
Enter the email address you want to grant access to, then click "Next Step".
Step 7: Send the Authorization Email
Click "Send email to grant access".
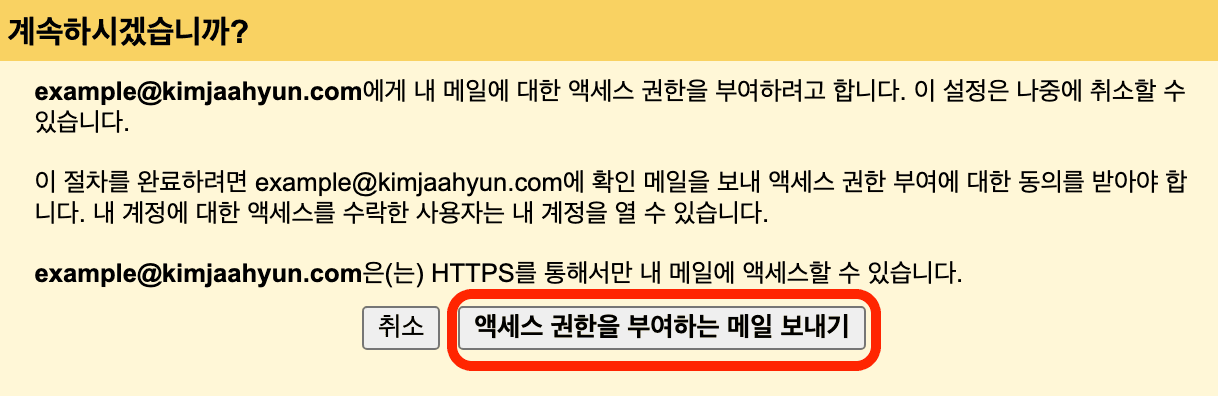
Step 8: Check the Pending Status
The status next to the delegated email address will show as 'Pending' (it should change to 'Accepted' later).

👤 Acceptance Process for the Delegate
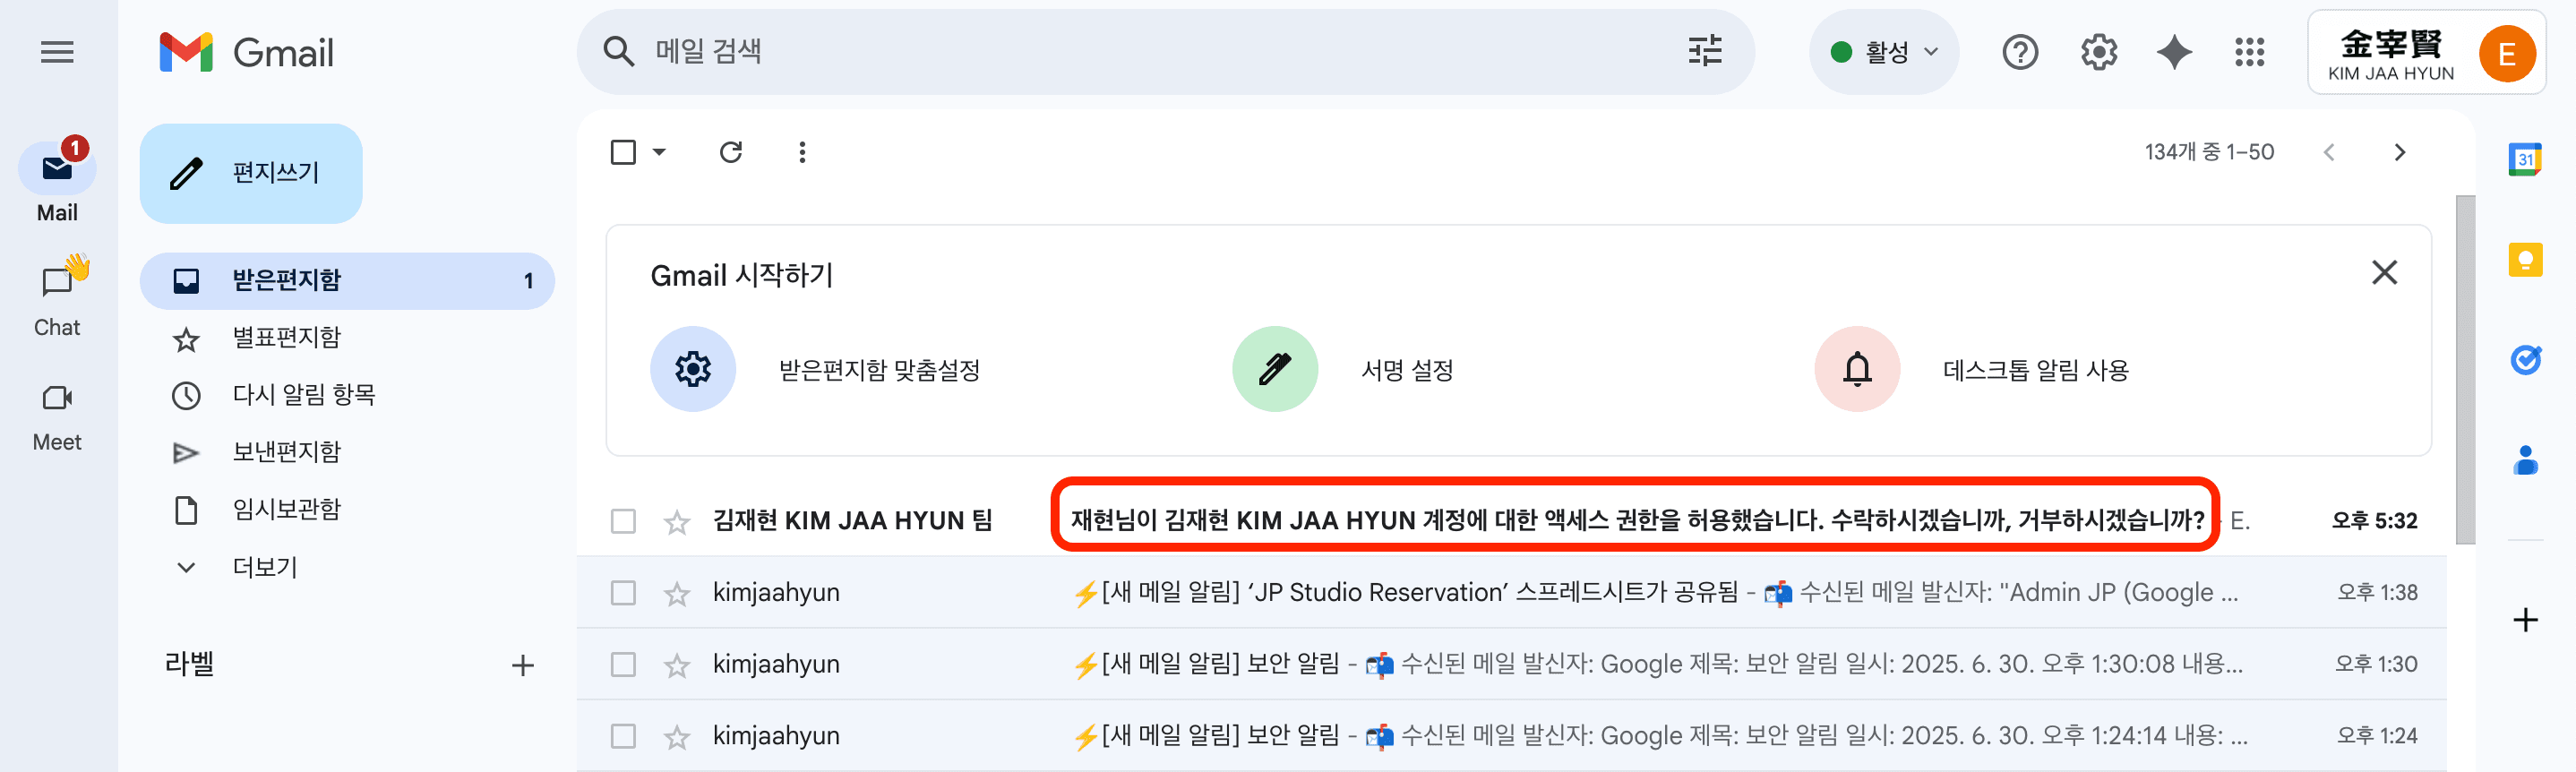
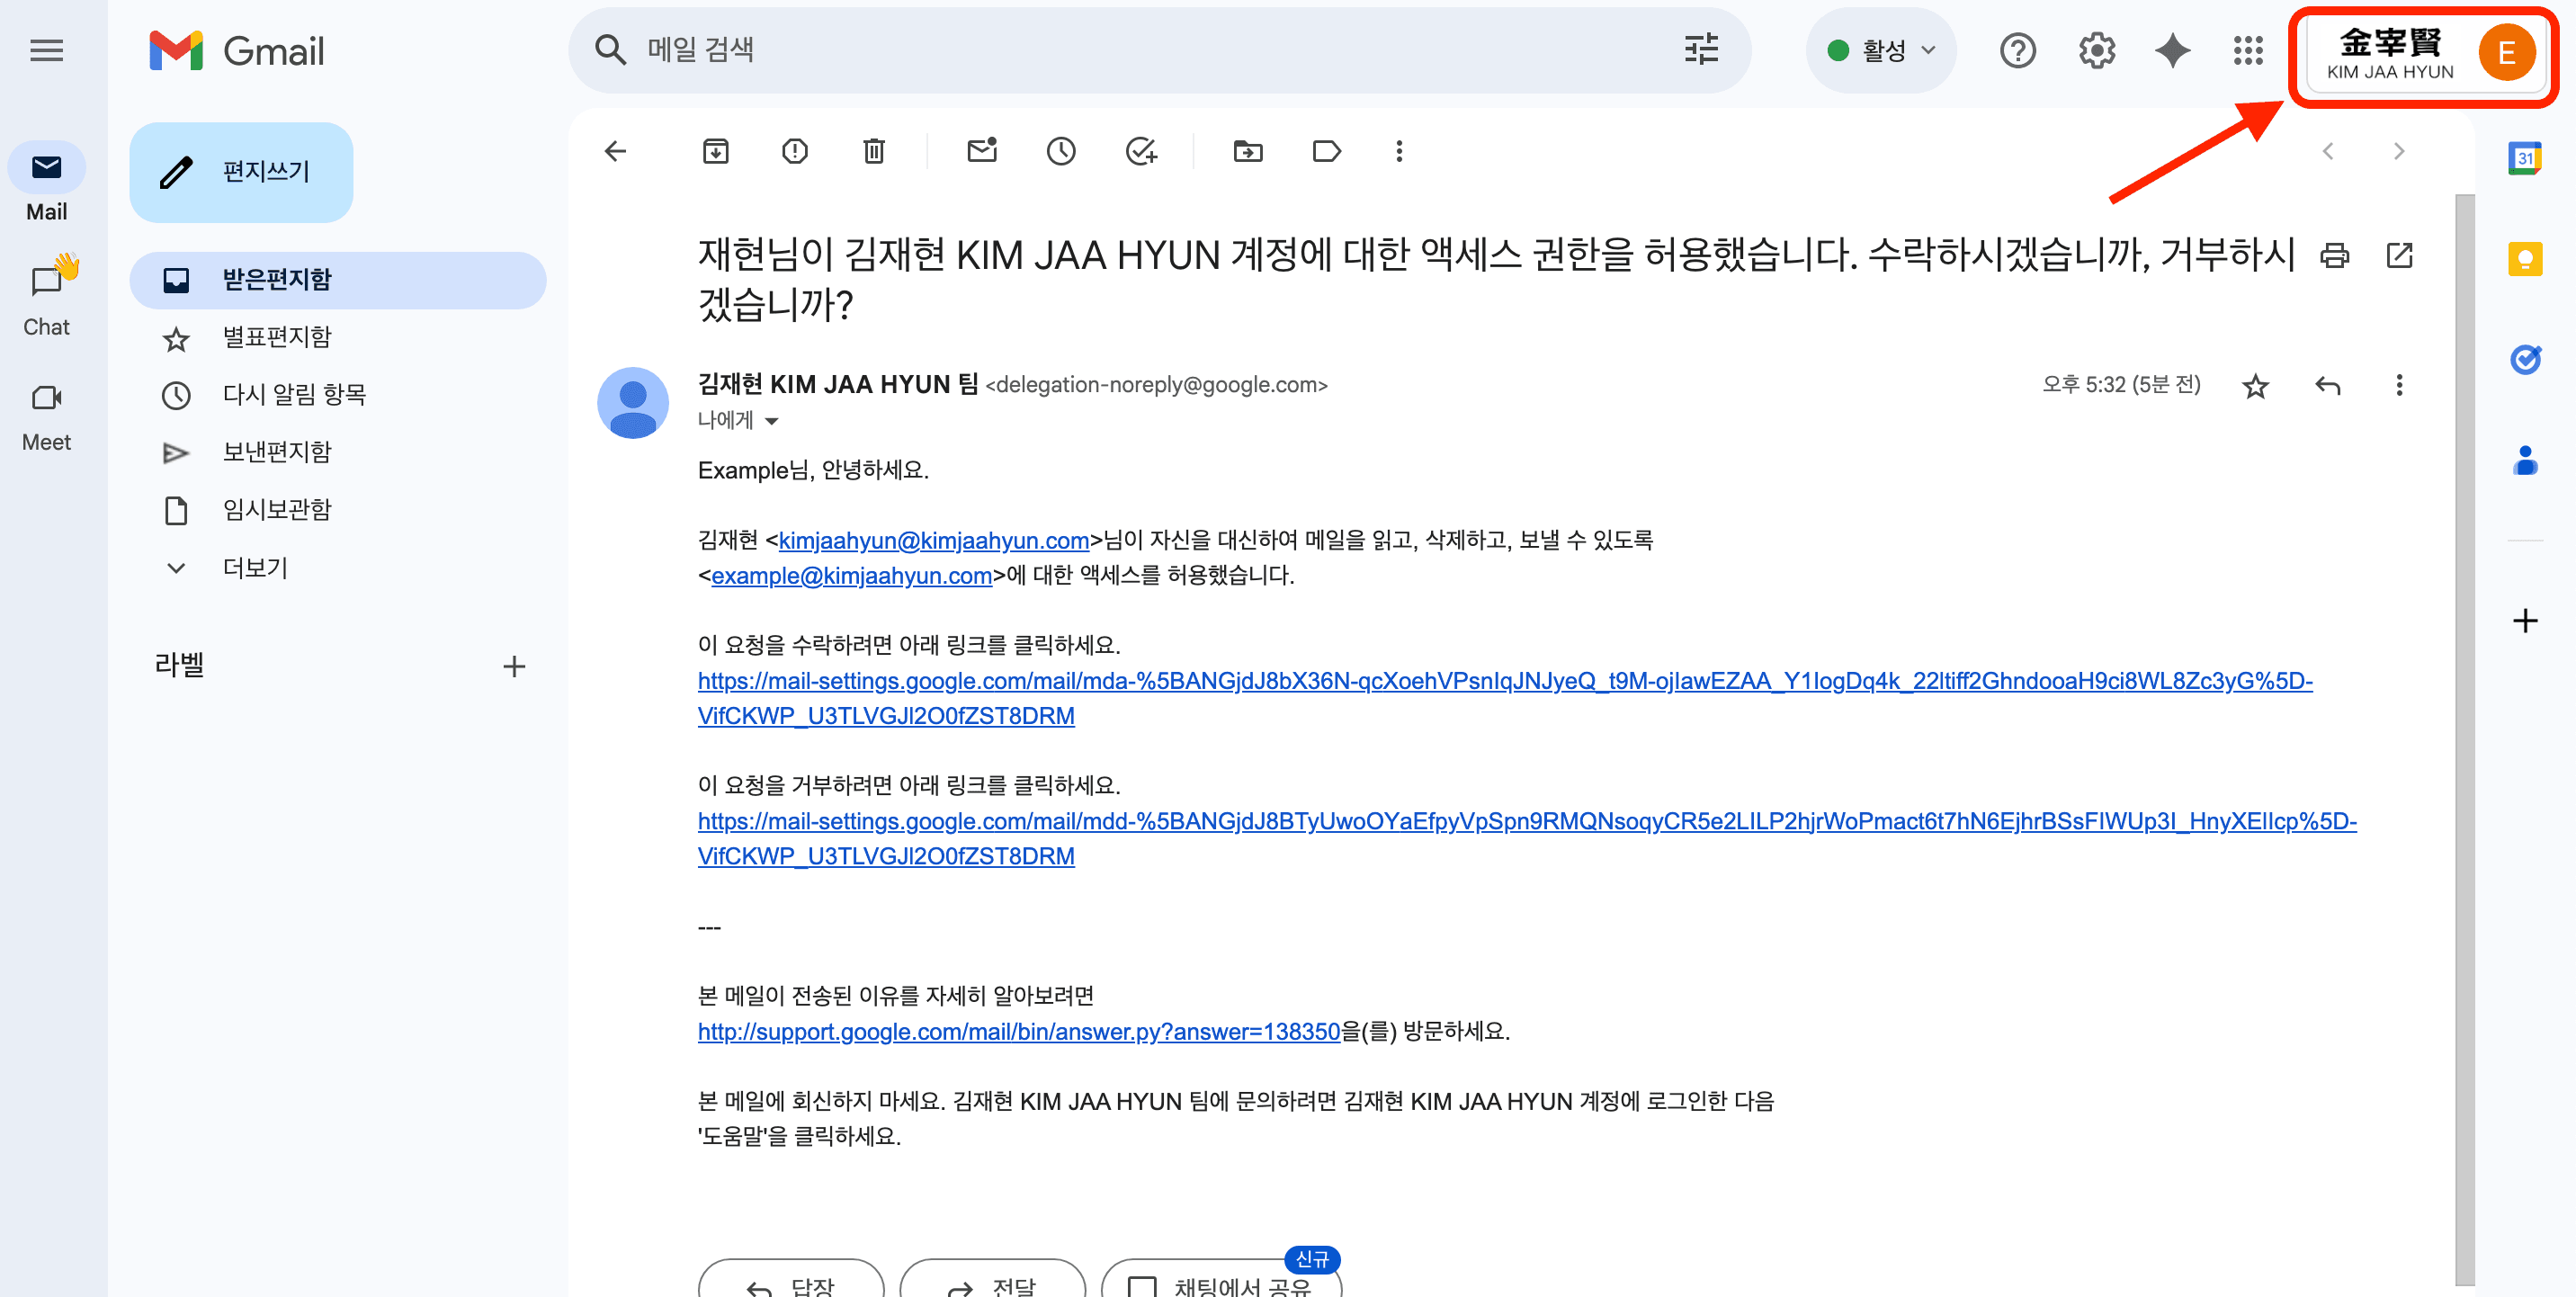
Step 9: Receive the Delegation Request Email
The delegate will receive an email like this:
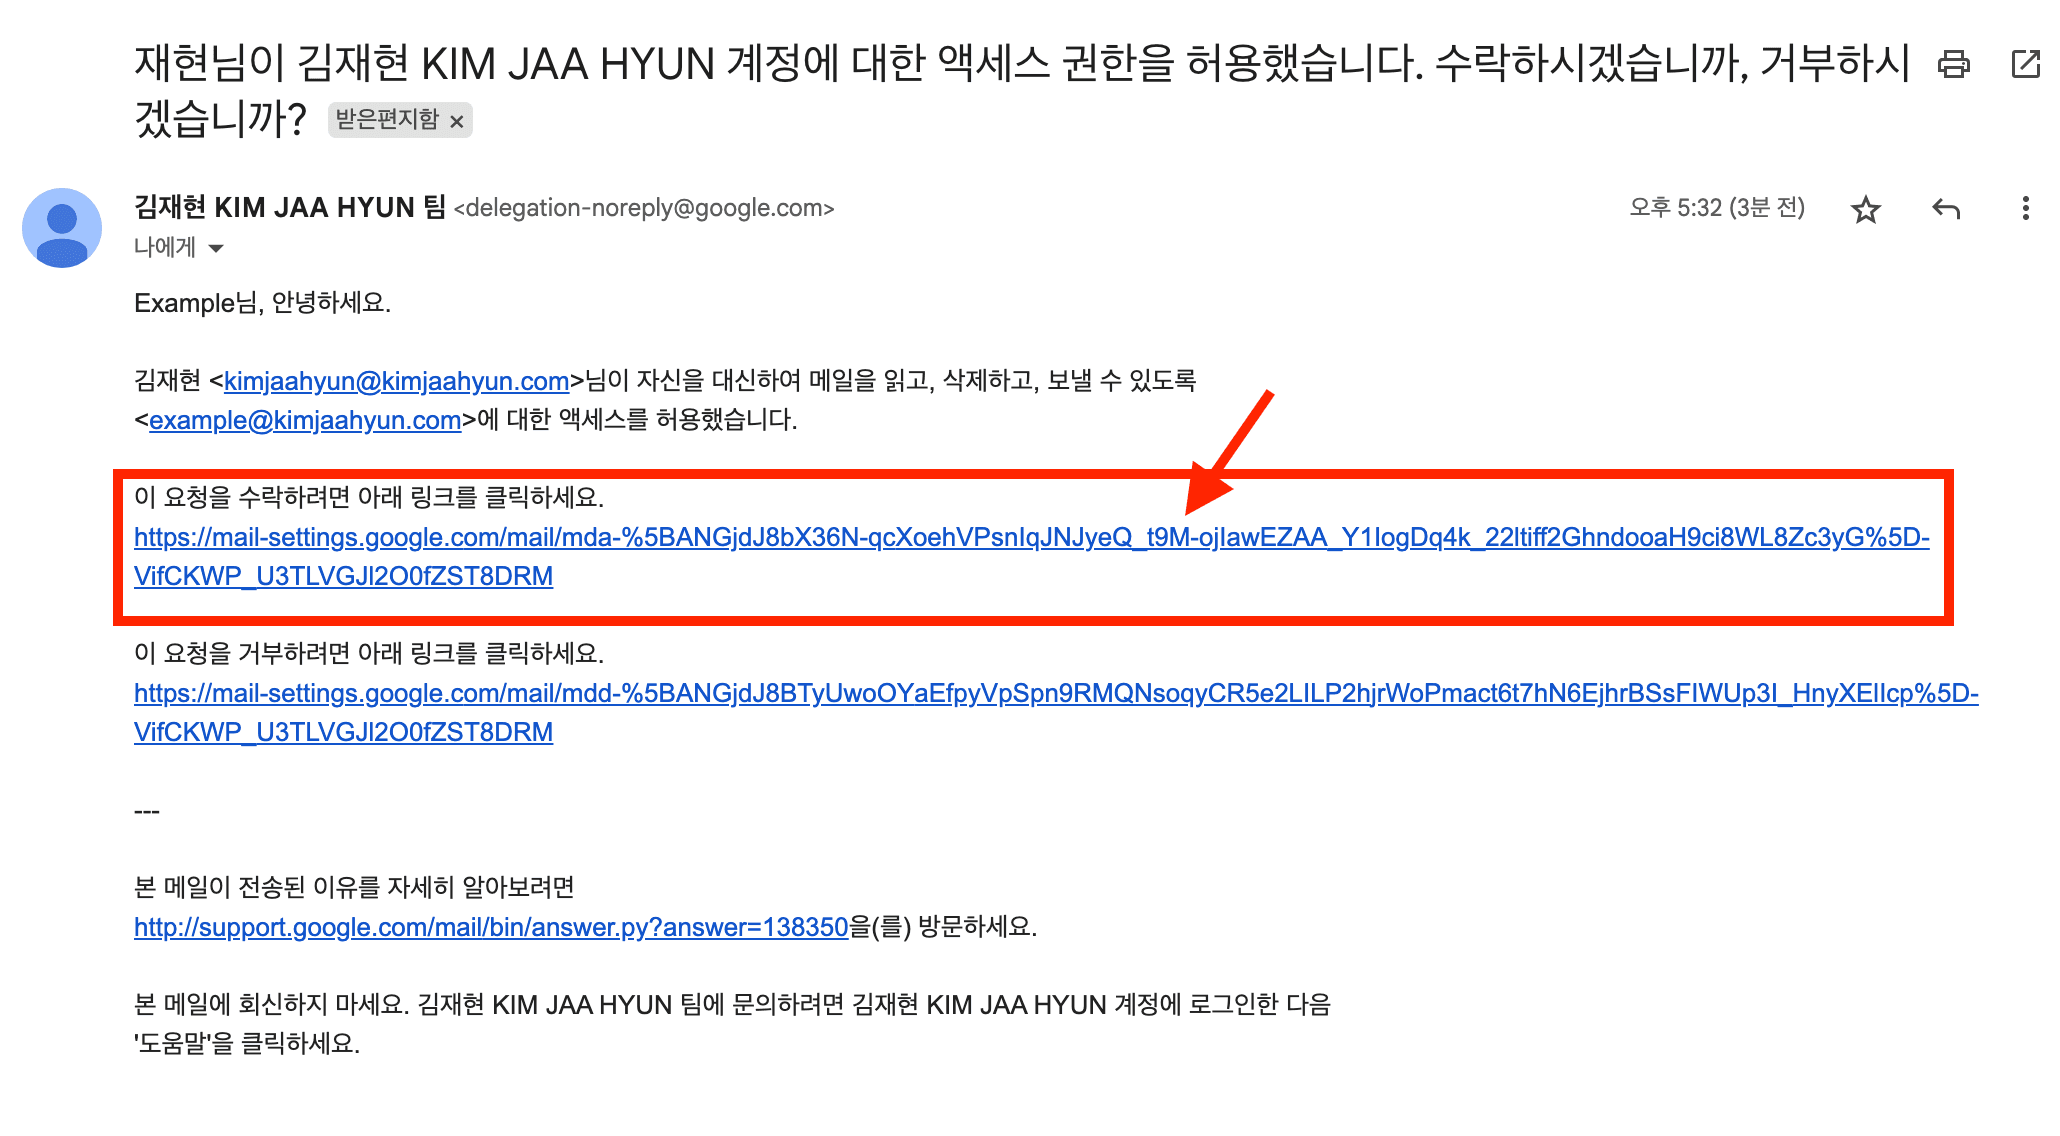
Step 10: Accept the Request
Click the link to accept the request in the email.
Step 11: Final Confirmation
Click the "Confirm" button.
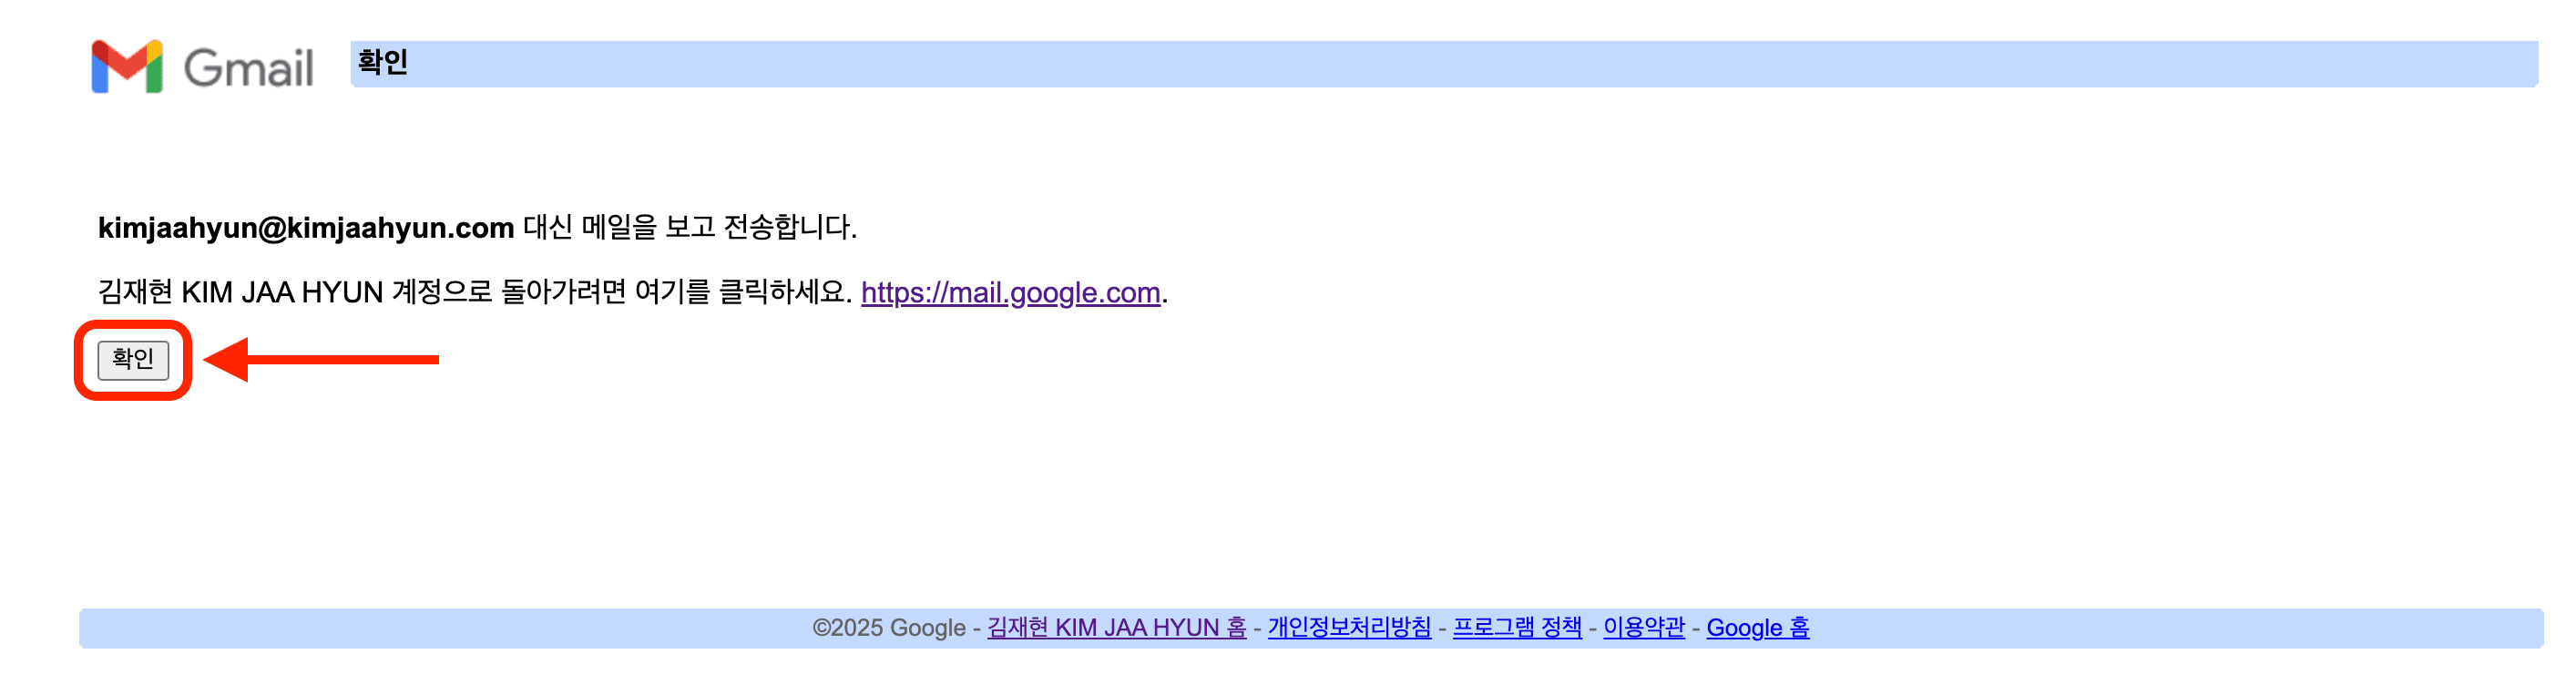
Step 12: Confirmation Complete
A confirmation window will appear.
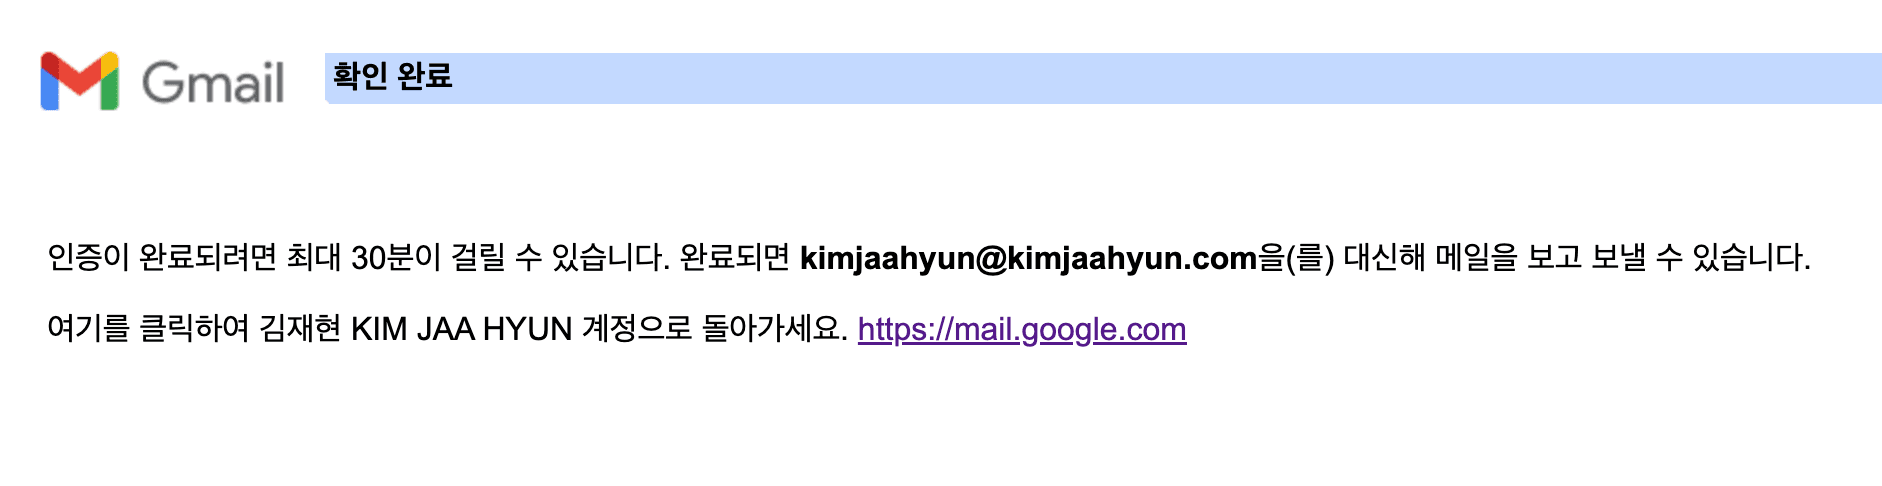
⏰ The instructions say it may take up to 30 minutes, but it often works immediately.
✅ Verifying the Delegation Setup
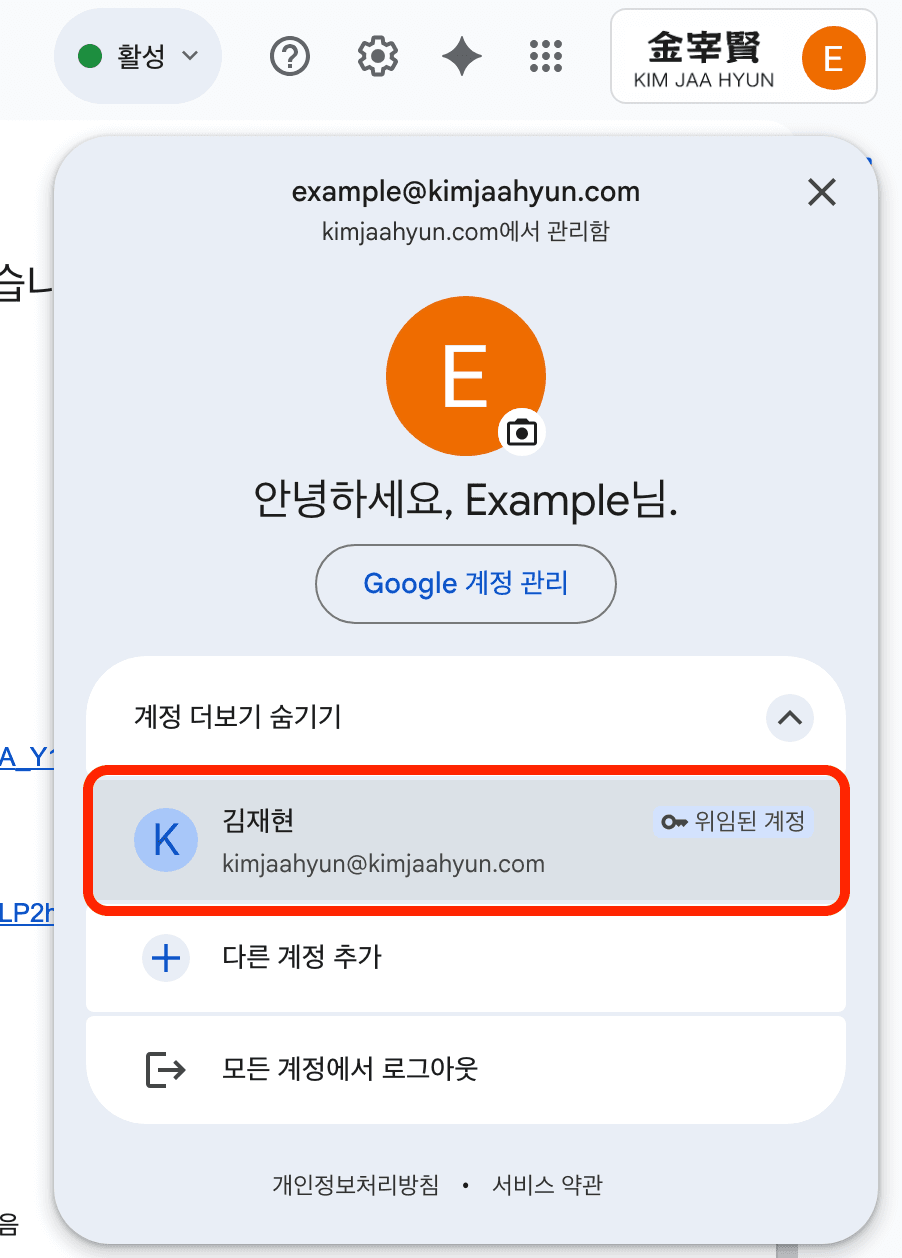
How the Delegate Can Verify:
Step 13: To check if the email delegation is active, the delegate should click on their profile picture in the top right corner.
Step 14: Check if the delegated account is listed.
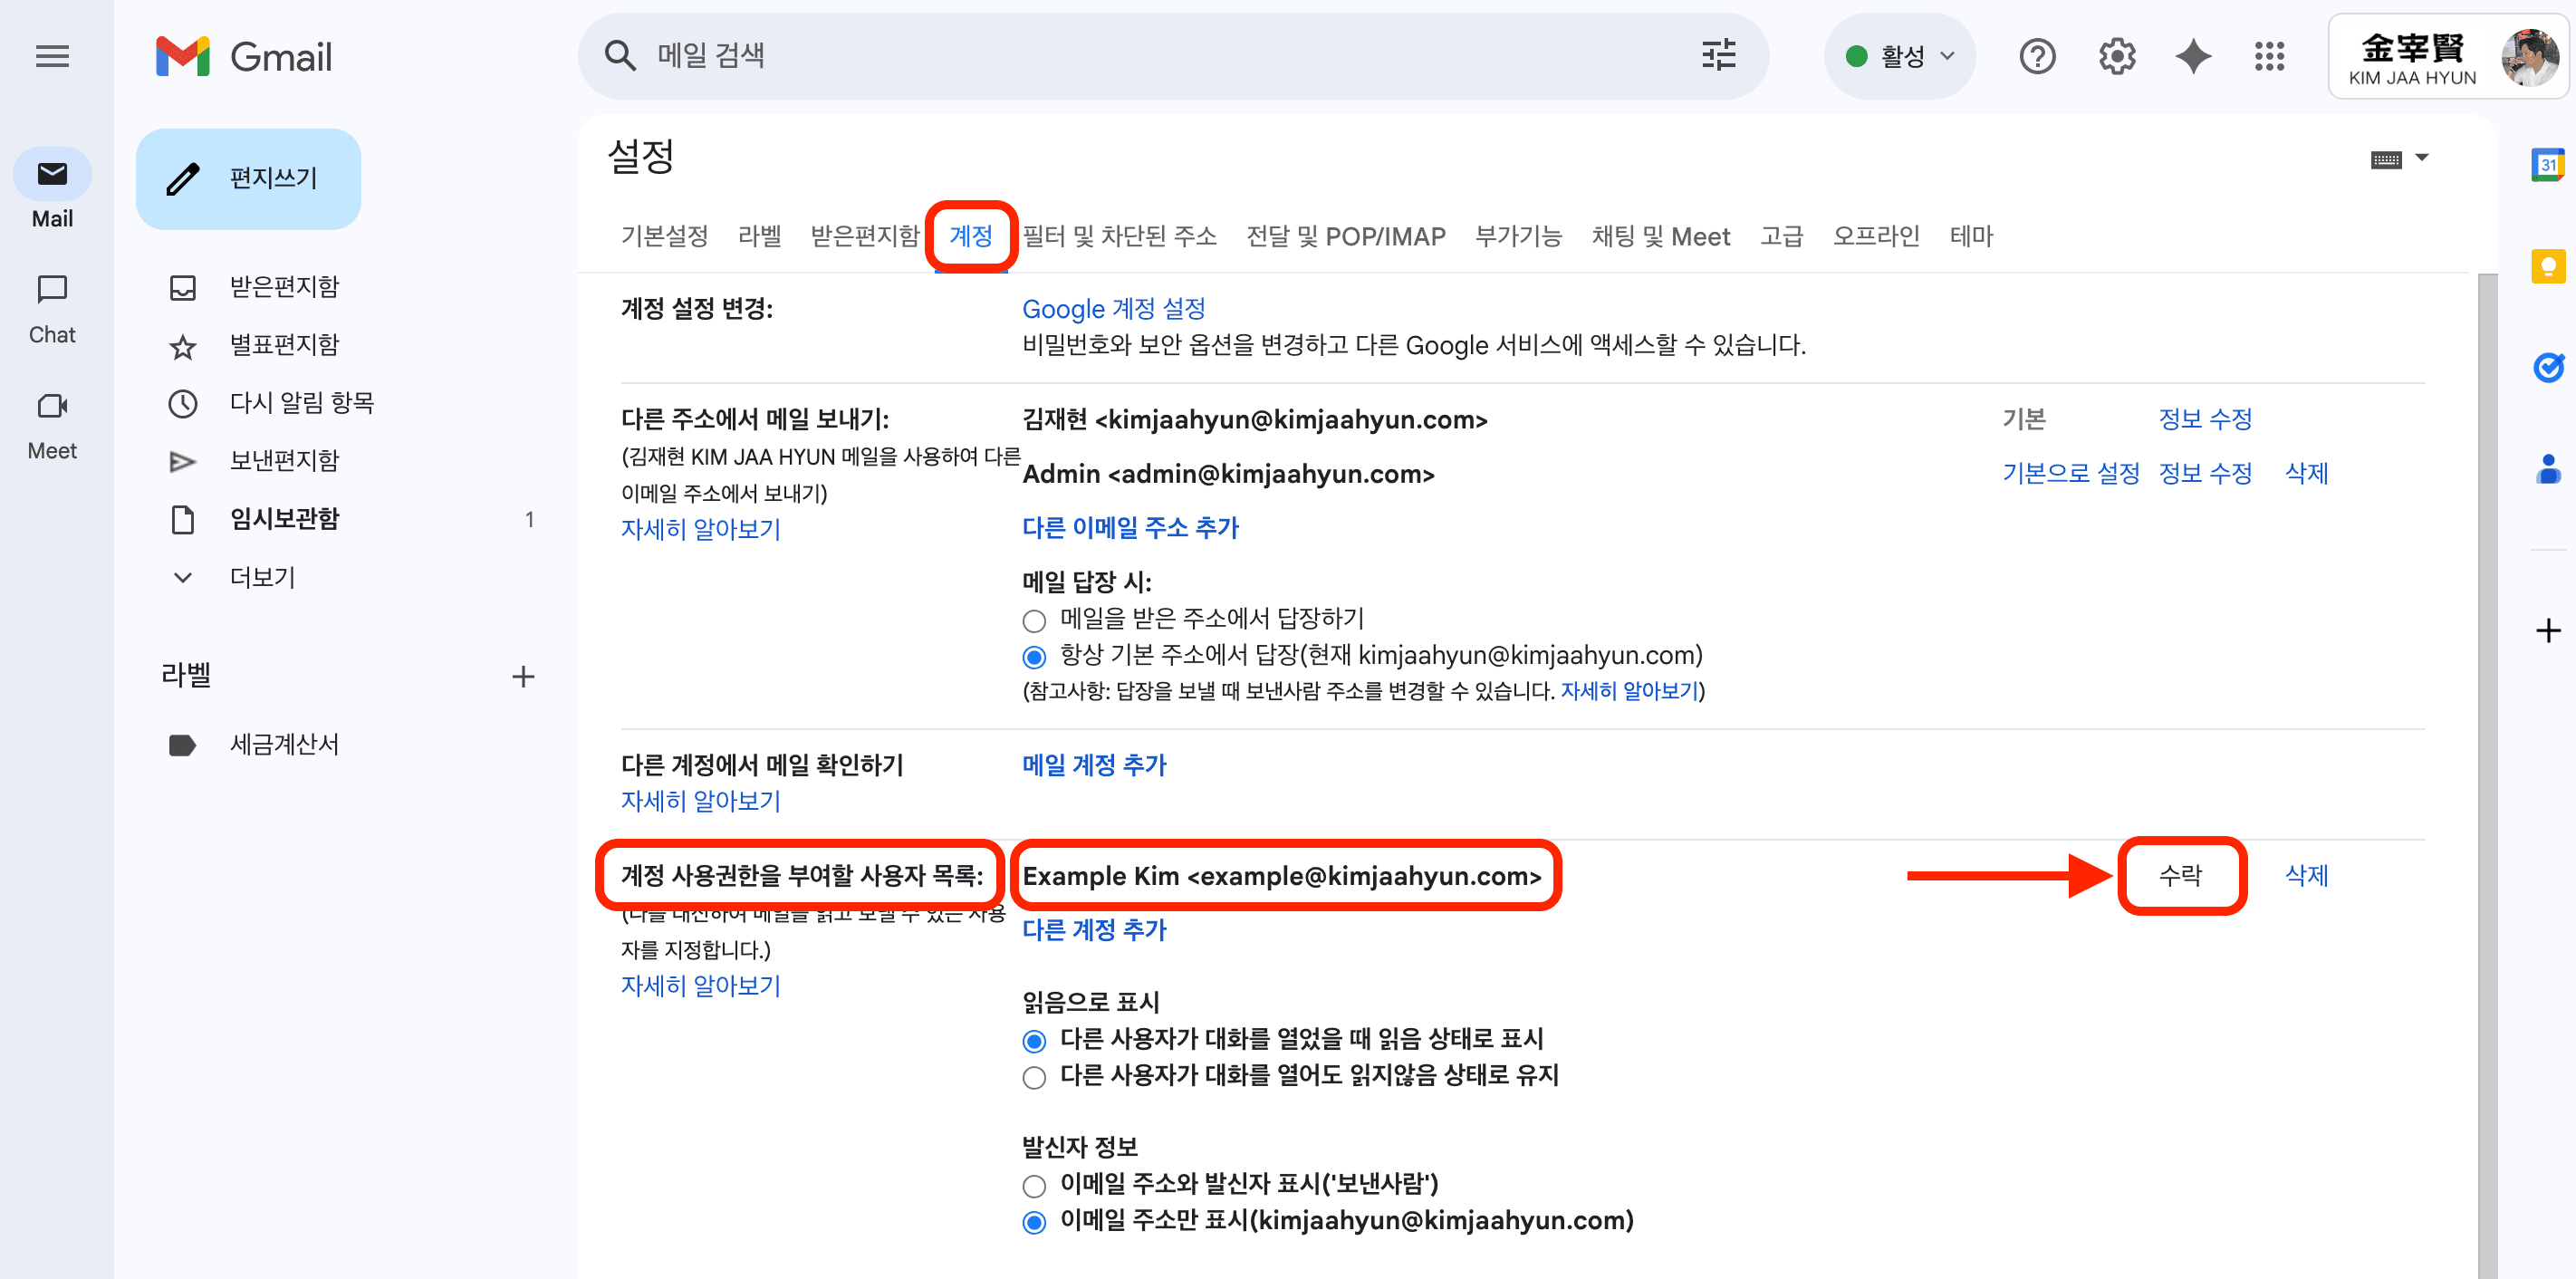
How the Delegator Can Verify:
Step 15: Check for the Accepted status next to the delegate's email.
To confirm the delegation from the delegator's account, go to Settings > Accounts > Grant access to your account, and check if the status next to the delegate's email is Accepted.
⚠️ However, the delegated account does not receive notifications for new emails.
For example, let's say the sales@company.com email is delegated to Administrator A's email, A_mail@company.com.
When a new email arrives at sales@company.com, no notification is sent to A_mail@company.com.
There are two ways to solve this.
📧 Solution 1: Auto-Forwarding
🎯 Summary:
When a new email arrives at sales@company.com, it is automatically forwarded to A_mail@company.com. This ensures that A_mail@company.com receives a notification.
✅ Advantages:
It's simple to set up.
❌ Disadvantages:
Administrator A is supposed to manage emails directly from the sales@company.com mailbox. However, auto-forwarding allows them to see all emails in their personal A_mail@company.com inbox. As a result, Administrator A may not feel the need to access the sales@company.com mailbox and might reply from their own account.
⚠️ This can lead to several problems:

- Status Mismatch: Even if Administrator A reads and replies to an email from
A_mail@company.com, the email in thesales@company.commailbox will remain marked as 'unread'. - Risk of Double Processing: Another team member managing the
sales@company.commailbox might see the unread email and reply again, leading to duplicate responses. - Work Confusion: It becomes difficult to track who has handled which email, causing confusion.
Below are the instructions for setting up auto-forwarding in Gmail (link to be added).
📮 How to Set Up Gmail Auto-Forwarding
Link to be added
🔔 Solution 2: Mail Echo for Gmail
Mail Echo for Gmail is a service that sends a notification email to the delegate's account when a new email arrives in the delegated account. This notification email includes a convenient link that takes you directly to the delegated mailbox.
Let's revisit the example of the sales@company.com account delegated to Administrator A (A_mail@company.com).
When a new email arrives at sales@company.com, Mail Echo sends a 'New Mail Notification' to A_mail@company.com.

Administrator A can simply click the link in the notification email to be taken directly to the sales@company.com mailbox to handle the task.

✅ Advantages:
- Real-time Notifications: The delegated account receives timely notifications for new emails.
- Quick Access to Tasks: The link in the notification email allows for one-click access to the delegated account (
sales@company.com), speeding up response times. - Shared Status and Transparency: All work is handled directly within the delegated account, so the read/unread status and reply history are transparent to all team members. This prevents the confusion and duplicate work that can occur with auto-forwarding.
🚀 Mail Echo for Gmail Installation Guide
Solve your delegated email notification problems and improve work efficiency by installing Mail Echo for Gmail.
☁️ Installation Method
Mail Echo for Gmail is installed directly into your Google Cloud environment. I will handle the entire installation process; you just need to provide some basic information. You don't need to worry about any complex procedures.
More Information
For installation inquiries or requests, please visit the Mail Echo for Gmail page.